
It’s a common scenario that many of us tend to confuse ourselves in figuring out what’s the actual difference between welding, soldering, and brazing.
Well, we’ll discover this shortly.
But first, let’s learn about all of them in particular.
What Is Welding?
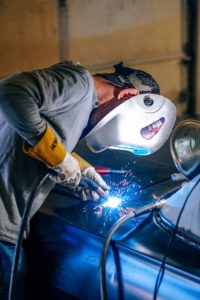 Welding is the process by which workpieces are strongly joined together by providing adequate heat and establishing an arc between their edges to melt the filler metal with the help of an electrode.
This way, any type of material can be strongly joined together regardless of their size. Besides, it’s admittedly the most frequently used material joining process among all manufacturing & repairing industries.
There is a diversified range of welding processes. Since there are many types of materials also and each of them has its own metal & chemical reaction when introduced with heat, it’ll be unsuitable and inconvenient for us if we are to use the same welding process for all of them. For this reason, welding processes are used in accordance with the type of materials being welded.
The two most common types of welding processes are Gas welding and Arc welding. Not to mention, each of them consists of different additional sub-categories of welding processes so as to use over different materials.
What Is Soldering?
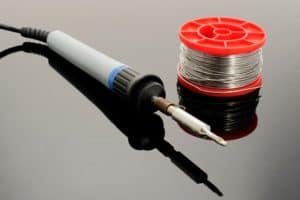 Soldering is another special type of material joining process which is mostly used over electronic devices to connect different components with the circuit boards in order to establish electrical connectivity.
Unlike welding or brazing (which we’ll learn about shortly), soldering uses the lowest amount of temperature to join metals and the process is performed using filler material without melting the base metal.
In this process, the solder itself is called the filler material which is basically melted right over the tip of the workpiece by using a soldering iron. However, flux is also used in soldering.
What Is Brazing?
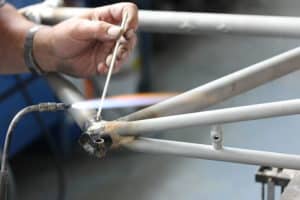 Brazing is basically a low temperature joining process that is performed by melting a flux solution with a filler metal by providing a reduced amount of heat. The main objective of using the brazing technique is to protect the base metal from being melted or damaged by heat and also performing some acute joining process that cannot be typically carried out by using welding or soldering techniques.
Brazing always uses some sort of gas in order to efficiently perform the joining process. Besides, materials that are ferrous and thinner are mostly joined by this process. Another core advantage of using the brazing technique is the ability to effortlessly join both similar and dissimilar materials.
See also: Brazing with a TIG welder
Welding Vs Soldering Vs Brazing: Similarities and Differences
Now let’s look into some common difference factors among each of these joining techniques:
- Temperature: welding always operates in a high level of temperature which can go up to 3000-degree Celsius or more depending upon the project whereas, the peak temperature for soldering and brazing is up to 450° Celsius and 800° Celsius respectively.
- Durability: well, in terms of the durability of a joint, welding is definitely the winner. Now if we compare soldering and brazing, the latter one is slightly durable than the former one which is soldering. But undoubtedly, it is way more specialized in joining electrically conductive connections.
- Base Metal Preparation: it basically means heating the base metal before joining. In case of welding, you don’t need to bother with doing this. But if you’re going to solder or braze the material, you’re certainly required to preheat that (the base metal) before initiating the process.
- Labor: well, all types of processes require some amount of labor & expertise in order to precisely join two materials together. Now think of welding only, it’ll certainly require you more energy and body movements. But in case of soldering, having concentration is the main labor for every operator although it requires only hand movements. Brazing can be put between these two.
- Heating: welding basically uses the highest temperature in joining parts. This can usually go over 450° Celsius. On the other hand, brazing and soldering perform on temperature which is below 450° Celsius.
Required Tools and Gears for Welding
Welding Tools
- A welder: for every Arc welding process, this is the most crucial tool of all. A welder is the main machine that supplies electrical power through the electrode for striking up the arc and perform welding. They come in different types, power, and functionality.
- Electrode: this stick-like thing is the only tool that carries the electrical current and produces the arc. It can be both consumable and non-consumable.
- Filler Metal: filler metal or consumables are basically a rod which is being fed inside the weld pool to fill out the gap between the joint. They are basically made of by the same material as the workpiece.
- Shielding Gas Cylinder: Shielding Gas Cylinder mainly supplies oxygen, argon and helium type gases during welding in a correct ratio in order to protect the weld area from metal and atmospheric contamination.
- Fuel Gas Cylinder (Gas Welding): this fuel is only used for powering gas welding operations.
- Sheet Metal Gauge and Magnet: sheet metal gauge is used to measure the accurate thickness of any metal part or workpiece whereas, magnets are used to hold the workpieces into different angles for simplifying the work.
- C-clamps: these are basically used for strongly holding the workpieces with the welding surface so that they don’t move apart.
Safety Gears
- Welding Helmet: the main job of this gear is to protect your head and eyes from potential sparks and fire that extensively generates during welding. Besides, many welding helmets now come with a built-in auto-darkening feature which helps the welder to duly observe the overall process.
- Fire-Proof Jacket or Sleeves: this jacket will shield your complete upper body from fire and sparks.
- Welding Gloves: these are very important. The welder must wear shock resistant thick gloves to prevent his hands and wrists from fire and flames.
- Chaps and Kneepads: chaps are mainly for protecting your lower body whereas kneepads give comfort over your movements.
- Welding Boots: last but not least, these best welding boots will safeguard your feet from hot metals and flame.
The Step-By-Step Process to Perform Welding
- Putting on Your Safety Gears: firstly, we’re required to wear safety gears including the fireproof jacket and welding chaps. We also need to wear our welding gloves and boots for ensuring overall safety.
- Preparation of Weld Metal: metal preparation means cleaning it off from all sources of paint, dust, oil & grease like unwanted substances which can result in porosity after the weld. We’ll also need to attach C-clamps with our workpieces.
- Configuring The Welder: now we need to configure our welder at the correct amperage & power settings. This will be determined according to the type and thickness of the material being welded.
- Setting Up The Torch: now we need to put our electrode inside the torch. This can be either consumable or non-consumable (tungsten) which will depend upon the type of welding process you’re performing.
- Perform Welding: now turn on the power and hold your welding torch at a standard angle. Now slowly keep drawing the lines while continuously feeding the filler metal inside the weld pool.
- Allow It to Cool Down: finally, allow the weld area for cooling down to normal temperature after which you’re ready to go.
Application Areas of Welding
Welding is basically used over all kinds of bigger and thicker materials that require a high amount of heat to get molten. For this, it’s used over every type of manufacturing & repairing industries including construction.
Welding Advantages
- Any type of materials can be welded
- It features durable joints
- It can join large and thicker materials effortlessly
Welding Disadvantages
- A bit expensive
- Not recommended for thinner metals
- Requires many tools and gears
Required Tools and Gears for Soldering
- Safety Glasses: although it’s not necessary to buy a separate helmet for soldering as it isn’t a fire-intensive work, wearing safety glasses can be enough to protect your eyes.
- Thick Gloves: thick gloves will protect your hands from subconsciously touching hot metals which can easily happen.
- Soldering Iron: this is basically a tool used to supply heat for melting off the solder in order to form a fusion between two workpieces.
- Filler Metals or Solder: this is the only consumable which will be laid between the joint of two workpieces.
The Step-By-Step Process to Perform Soldering
- Clean The Solder: at first, we’re required to completely clean our solder from all sorts of unwanted substances like paint, oil, grease, wax, etc.
- Heat the Connecting Area: now we need to heat the connecting area except the solder. We need to ensure that both joining parts are adequately heated in order to apply solder.
- Apply Solder: now we need to grab the soldering iron and put it right next to the connection. Now hold the solder in the opposite direction and apply it between the joint.
- Some Precautions: always avoid overheating the connecting area and try to move aside the soldering iron as soon as the joint is visibly formed.
- Avoid Moving The Connection: it’s our recommendation that you do not move the connection before it gets cool because it may easily be separated if the solder hasn’t solidified yet.
Application Areas of Soldering
Soldering is very popular in all sorts of electrical device manufacturing industries. It is basically used over joining wires and different electrical components with circuit boards. This can also be used to repair electrical connections from the circuit board.
Soldering Advantages
- Cost-effective
- Only the solder is melted
- Ability to join dissimilar parts together
Soldering Disadvantages
- Cannot join larger parts or materials
- Joints are less durable
Required Tools and Gears for Brazing
- Safety Glasses and Thick Gloves: like the ones from soldering, safety glasses will safeguard your eyes whereas thick gloves protect your hands and wrists.
- Respirator or Safety Mask: brazing can generate a considerable amount of gas and fume which are toxic for our body to inhale. So we’ll need a respirator or at least a mask. Using a welding fume extractor will be very helpful as well.
- Brazing Torch: this torch is the main tool in which the workpieces will be melted in order to form a joint by brazing.
- C-clams: c-clamps can be very handy in order to firmly hold down the workpieces with your working surface so they don’t move aside during brazing.
- Wire Brush: this will be used to clean our workpieces from unwanted substances like paint, grease, wax, etc.
- Filler Metal: filler metals basically work as a flux solution in brazing. They are also called brazing rods. There’re many popular types of filler metals including chlorides, fluoroborates, fluorides, etc.
The Step-By-Step Process to Perform Brazing
- Put On Your Safety Gear: at first, you’re required to wear your safety glasses and safety gloves. Besides, you’ll also need to wear a respirator or mask
- Prepare The Metal: this includes cleaning the surface of your workpiece by using the wire brush from all sorts of unwanted substances. Afterward, we need to clean them in soapy water.
- Clamping: as we know, clamping is basically a workpiece securing approach which is performed by attaching C-clamps with the metal parts being welded. This helps the workpieces to be in an exact position.
- Preheating: we need to perform preheating over the joint for making the brazing task more effective and durable. Consequently, the joint will start glowing overtime after which we’ll apply the filler metal.
- Apply Filler Metal: now, we need to simultaneously feed the filler metal into the joint while heating it.
- Post Cleaning: after the brazing is done, just clean the joint area with the wire brush again and you’re ready to go.
Application Areas of Brazing
Brazing is basically used for joining thinner metals together which cannot be joined using welding. Brazing also doesn’t require your base metal to get molten which can be very effective for assembling a large number of parts together. Brazing is used in numerous manufacturing industries.
Brazing advantages
- Features aesthetic joints
- Only the filler metal is melted
- Can join both non-metals and dissimilar metals
Brazing Disadvantages
- Not-recommended for joining larger parts
- Joint is vulnerable to heat
- Less durable than welding
Final Words
Thanks for reading the whole post. We believe now you can easily sort out all the differences between each of these joining techniques while knowing which one is best for what type of work. Stay along with us for our upcoming articles. Thanks.