Welding can be described as an art. If you are a passionate welder, you know what I mean.
But most importantly, it is the process of joining a diversified range of materials through melting them at high temperature. Pretty much straight, Right?
But hold on, there are so many crucial aspects associated with this process. Without knowing them, your dream of being an efficient welder will just be in vain.
So in this guide, we’re going to walk you through some of the basics of welding that you must know in order to become an efficient welder and prior to go in practice.
So let’s begin with the types of welding first:
Major Types of Welding
Welding processes can be classified into seven categories within which there are some subcategories which are very well known in the welding industry. Let’s learn about them in brief:
1. Arc Welding
Arc welding is by far the most popular welding process among the list. The main concept of this process is to use electricity for heating up the workpiece and melt them to produce a strong joint. Now, this process uses an electrode which can be both consumable and non-consumable. It produces an electronic arc right in between the electrode and the workpiece with the help of a constant power supply.

Arc welding can be classified into multiple categories among which some of them are extremely popular in the welding arena because of their efficiency and ease of use. Let’s explore them:
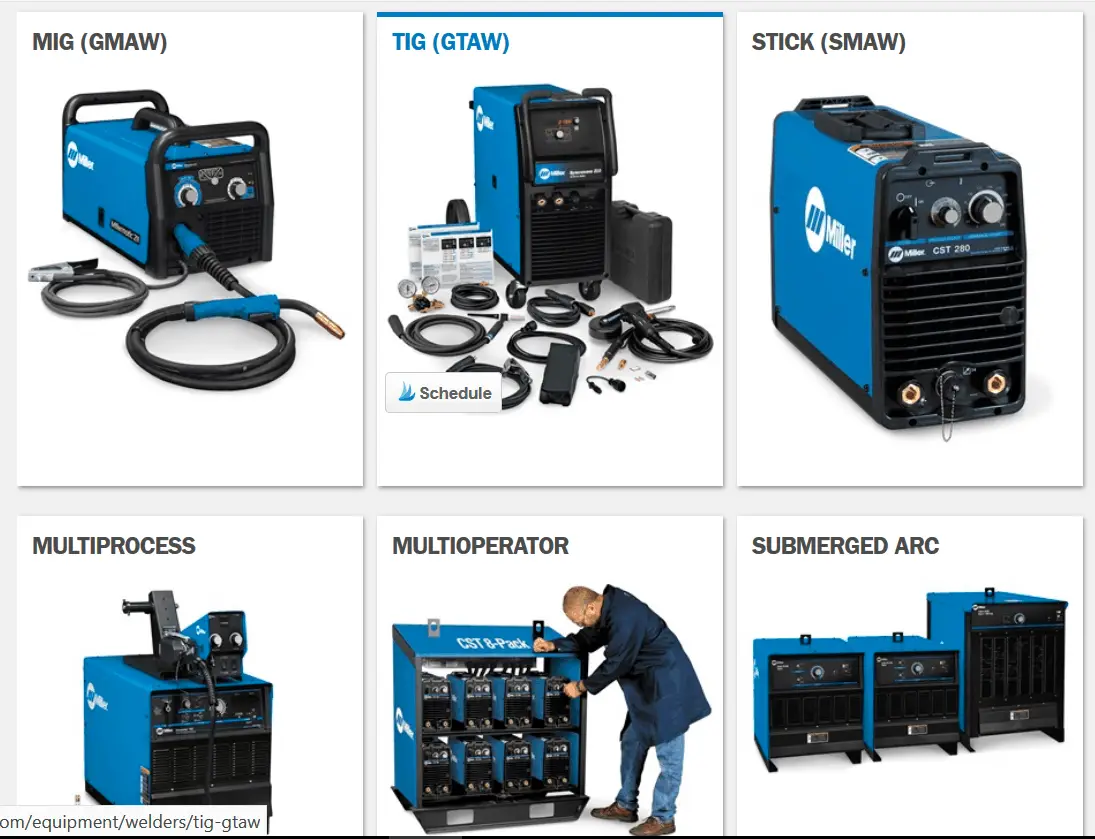
- Shielded Metal Arc Welding: This process is also known as Stick Welding which generally uses AC or DC power for striking up the arc. The unique part of this process is the flux coating of the electrode that subsequently generates vapor when introduced to heat and to work as a protection against contamination.
- Metal Inert Gas Welding: This process is also known as Gas Metal Arc Welding which generally uses a separate gas cylinder to work against contamination. The process can be both automatic and semi-automatic and requires a constant power supply.
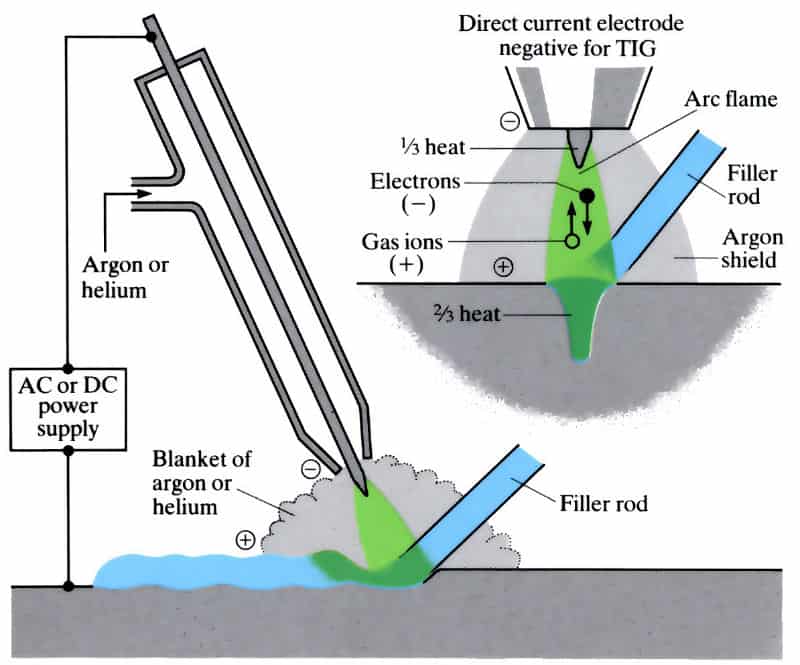
- Tungsten Inert Gas Arc Welding: This process is also known as Gas Tungsten Arc Welding that basically uses a non-consumable tungsten electrode for striking up the arc. The process may use filler metal to cover up the gap and the application of shielding gas depends upon whether the process is autogenous or not.
- Submerged Arc Welding: As the name suggests, this process basically dips the molten workpiece and electrode under a fused covering of flux that protects it from contamination and also uses a consumable electrode for striking up the arc.
- Carbon Arc Welding: This process is one of the oldest welding processes in the list which uses a carbon electrode for striking up the arc. The arc may produce temperature more than 3000°C that results in the liquidation of the workpiece and electrode which subsequently produces a strong fusion between the materials.
- Plasma Arc Welding: This process uses plasma for striking up the arc which exits through a copper nozzle and the temperature there may rise as high as 28,000°C which is 4-5 times higher than any typical arc welding process.
- Electroslag Welding: This is a unique welding process whereas the workpiece is covered under a layer of fluxing powder which gets liquefied when introduced to the arc. Now, this slag layer reaches a temperature of 1900°C and consequently melts the workpiece which results in a strong joint.
2. Resistance Welding:
This process usually melts the workpiece by simultaneously applying strong pressure and localized heat from the contact area and results in a strong fusion of that area after solidification.
3. Gas Welding:
This unique process emits a flame from the welding torch which is basically a proper combination of Oxygen and fuel gas. The heat generated from this flame results in the liquidation of the workpieces and subsequently produces a strong joint over that area.
4. Solid-State Welding:
Similar to that of Gas Welding, this process also uses a strong pressure with high temperature to melt the parent material that consequently results in fusion after solidification.
5. Thermit Welding:
This unique process uses an exothermic chemical to produce heat which is basically a combination of aluminum powder and metal oxide. Thus the chemical reaction melts the workpiece and results in a strong joint.
6. Electron Beam Welding:
This process converts kinetic energy into thermal energy of the workpiece through supplying electron beams to melt the metals inside of a vacuum chamber.
7. Laser Welding:
Finally, this process heats up the workpiece with the help of a highly powerful laser beam which melts the two workpieces and produces a joint after solidification.
Welding Basics: Required Tools
Now, we’re going to learn about all the essential tools and gears that are must be required to perform a welding operation. Let’s explore them:
- A Welder: A welder is a first and foremost essential equipment you’re going to need to start your welding career. This is basically the tool that supplies constant current through the electrode for striking up the arc. The welder can be a MIG/ TIG or maybe a Stick welder. You should definitely get the one that goes with your material type and requirement.

Different Types of Welder - Electrodes: Another crucial tool of the list, an electrode can be both consumable and non-consumable which basically produces an electronic arc between the workpiece and the electrode itself to produce heat and melt the workpiece.
- Filler Metal: Filler metals may sometime require in a certain type of welding where the electrode is basically non-consumable and it works as a cover to fill up the gap.
- Shielding Gas: You may definitely have heard about this item before. Shielding gas is the only item that protects the overall welding from all sorts of atmospheric contamination.
Other Essential Tools
- Safety Glasses: As safety is our first priority, you must have safety glasses in your fleet since welding produces an incalculable amount of sparks which can go into your eyes and damage them. Besides, make sure to buy glasses which feature non-tinted transparent lenses.
- Welding Gloves: Welding gloves will completely protect your skin from heat and subconsciously approaching to the electric arc. Besides, the slag layer can jump over your skin and potentially burn them if you work barehanded. Just buy the one that fits in your both hands for preventing bad gripping.
- Auto Darkening Helmets: This is admittedly one of the most crucial items of this list. Since we already know welding generates a massive amount of sparks and flames, it is very essential to keep your eyes and face protected against them. However, the auto-darkening feature will allow you to closely observe the welding process despite having intense bright light.
- Chipping Hammer: Chipping hammers are very useful because they allow you to remove any weld spatter or slag out of your workpiece.
- Metal Brush: Unlike chipping hammer, this tool will allow you to clean up your workpiece surface from all sorts of dirt and debris to prevent metal contamination.
- Soapstone: Soapstones basically work as permanent markers to mark down the areas and points over which the welding will be performed.
- Angle Grinders: Angle grinders are also known as disc or side grinders which are used to polish and smoothing up the workpiece after welding.
- Ear Protection: As we value the welders’ safety first, you should definitely wear earplugs during welding since the process produces intense loud noise which may harm your ears. On top of that, they will certainly help you to concentrate more on the task.
- Fire Resistant Jacket: Another crucial item on the list, a fire-resistant jacket will fully protect your skin from catching fire and having metal sparks jumping over the skin.
- Welding Table: A welding table is another must-have item in your list because welding on the ground may sometime get risky which also hampers your concentration to the process. You can easily get a portable welding table from the shop and also make your own for lifetime use.
- Welding Support Accessories: Apart from all these, you are going to need some support stuffs like clamps, weights, fire extinguisher, and magnets which will be helpful during your welding operation.
Welding Basics: Steps of Welding
Now we’re going to learn about all the basic sequential steps of performing a welding operation and how each of those tools and gears integrates together to produce quality output. So let’s begin:
1. Wear Your Safety Clothes:
This is the first and foremost step before beginning the welding task. Just make sure to wear your fire-resistant jacket, safety gloves, glasses, and auto-darkening helmet before holding the torch. Not to mention, make sure your welding room has an adequate ventilation system and the fire extinguisher has been placed near your welding table.
2. Setting up Your Welder Machine:
This time you have to set up your welder machine according to the thickness and type of your welding material. If you are going to MIG weld, you may select the AC power. But make sure all the settings including amperage have been selected in accordance with the type of your workpiece and welding process.
3. Start By Drawing Some Test Lines:
Well this is a very critical step because it will not only allow you to ensure settings and connections are accurately put together but also certify that you are doing it the right way. Besides, you can edit any settings subsequently if the weld bead doesn’t seem to be perfectly drawn.
4. Preparing The Metal:
Preparing the metal means to clean its surface using a welding brush from all sorts of porosity occurring substances like paint, oil, grease, and dust. Besides you can also grind or slightly bevel its edges to ensure a deep penetration of the weld metal.
5. Positioning The Pieces Together:
If you are going to weld furniture like a table or a tool, chances are there will be a lot of small parts which are needed to put together into their actual shape. In this regard, you can use triangle squares and tack welding techniques (hold the parts in a temporary means) to carry out this task.
6. Perform Welding:
Now turn on the welding machine and squeeze the trigger. Make sure your body and the torch is placed into an accurate angle. Just draw a straight line of weld over the workpiece while preciously moving the arc to ensure deep penetration.
7. Post Welding Cleanup:
Now you should clean up your finished workpiece to remove any remaining slag material and also grind along the line to make it sharper.
8. Practice Practice & Practice:
Lastly, in order to become a professional welder you are required to practice as much as possible to build up intuitive wisdom inside you.
Final Words
Thanks for reading the whole post. We are always enriching our site with precious welding related guides and articles. Be sure to come over again and bookmark the ones that seem very helpful to you. Thanks for being with us.
