
MIG welding is one of the most effortless and convenient welding processes for combining materials. This process is popular for its simplicity and cost efficiency among all beginner to professional level welders. Not only that, you’ll be able to weld a diversified range of materials regardless of their type and thickness.
Now in this guide, you’re going to learn about the basics of MIG welding as well as the technical aspects of it. We’ll also share all the sequential steps to effectively perform it.
So let’s begin:
What Is MIG Welding
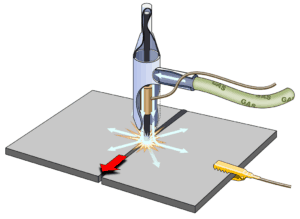
MIG welding is also known as Gas metal arc welding [GMAW] which is a process by which metals are joined by forming an electronic arc over them and melt with the help of a consumable electrode. The process also uses shielding gas which helps the metal against all atmospheric contamination.
Now practically, there are a number of technical and cautionary things you need to consider while doing the actual work, which we shall come back to on the sequential steps segment. But for now, let’s learn about the broadness of its application in the industry.
What Is MIG Welding Used For
MIG welding can be used over a wide range of metals. Besides, it is popular for its ability to weld a number of strong and thick materials in a convenient manner. Now, among all the categories, four types of materials are frequently used. They are:
- Aluminum
- Stainless steel
- Typical mild steel
- Copper alloys and copper
Apart from these, MIG welding can also be used over magnesium and nickel objects regardless of the thickness of any category.
Detailed Steps and Cautionary Steps of MIG Welding
MIG welding is one of the most easy-to-learn and cost-effective welding processes that require less equipment than that of other welding types. Do you know when and how did MIG welding came out?
Well, surprisingly it was invented during World War II just as to manufacture the weapons faster. Pretty much interesting, right? Since then, it’s been developed and modernized over the years and now the process is a lot more effective and established in comparison to that period.
1. Protection For Yourself
Now before starting to MIG weld, you’re going to need some safety measures. This will save you from all potential risks of fire and accident. It’ll include a welding helmet, leather hand gloves, leather shoes, fire-resistant jacket [full sleeve], full-length pants without cuffs, and safety glasses with skull cap to prevent any flame reaching your upper head.
2. Preparation of Metal
Although MIG welding uses shielding gas to fight against air contamination, physical cleaning of the metal being welded is essential before starting any welding task. This will remove any potential dirt or oil out from the surface of the metal. Besides, you can use a grinder or a metal brush to conveniently clean the surface area. Now, if you are welding a thick or strong material, you should slope the joint before driving the arc over it. Consequently, it will make a Deep penetration to the base metal and force it to strongly fuse together.
3. Some Prerequisites
- Polarity: MIG welding runs on DC polarity. Make sure the connection is properly set from the machine.
- Gas Flow: The proper rate in which shielding gas should be flown is between 20 to 25 cubic feet per hour. Just make sure the hose is free from any hole, otherwise, replace it.
- Tension Adjustment: This is crucial as too little or much tension can cause inefficient feeding of the wire. So make sure both the wire spool and drive rolls are on accurate tension according to their manual.
- Cable Connections: Make sure all the cables are properly connected and positioned to their required place in order to ensure a safe and smooth welding.
4. Wire and Gas Selection
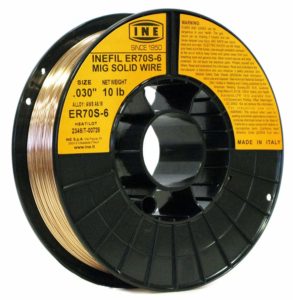
Wire: There are basically two types of wire that are frequently used in MIG welding. They are ER70S-3 and ER70S-6. The first one can be used for almost all purposes whereas the second one is especially used over metals with excessive rust on it. Now, wire diameter also plays a big role in producing the accurate heat-affected zone. You can use a .030 inch wire over any thick material whereas a .025 inch can be suitable over thinner materials and to reduce the heat-affected zone respectively.
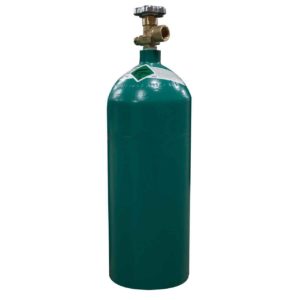
Gas: MIG welding requires an accurate composition of all the ingredients in its shielding gas in order to efficiently work as a barrier against all types of metal contamination. A 3:1 ratio of Argon and Carbon dioxide can be best over carbon steel type materials. Besides, if you want a strong penetration over your weld metal, a 100% carbon dioxide version will be best suited for that.
Check this article to know why you can’t use the same gas for MIG and TIG welding.
Another interesting article about why is my mig welder popping!
5. Correct Voltage with Amperage
This is undoubtedly the most crucial thing you need to be aware of after concerning about the travel speed. This is because, welding without correct amperage and voltage can cause serious porosity and undercut over the weld metal. The selection of accurate voltage with amperage will depend upon the type of material, shielding gas, speed and the position of the weld.
6. Stick-Out of the Wire
Do you know stick out is important in MIG welding? Well, it helps to produce low voltage penetration and a stable arc which is absolutely necessary for a perfect welding task. Basically, it’s the visible length of the electrode which is non-melted and came out from the end of the tube. The proper size should be 3/8 inches.
7. Choosing the Correct Welding Technique
Do you know using the proper welding technique can result in producing the required size of weld bead and penetration? Well, there are basically two techniques to handle that. They are the push and pull techniques. The push technique involves keeping the gun aside from the weld pedal which consequently produces low penetration and wider beads whereas the pull technique involves dragging the gun to the weld pedal which leaves a narrower bead but stronger penetration.
8. Travel and Working Angle
Now there’s a small difference between the traveling and working angle of MIG welding. Traveling angle denotes to the perpendicular position of the gun whilst working angle is more important as it denotes to the position of the gun in relation to the welding joint angle. A standard traveling angle should be between 5 – 15 degrees. But if it crosses 20 degrees, it may result in weak penetration and instability of the arc.
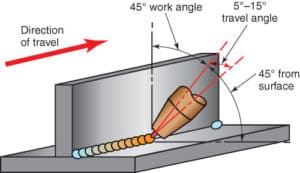
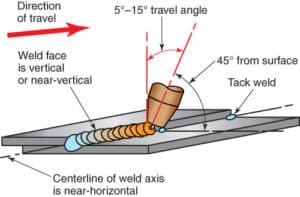
Image Source: https://www.halversoncts.com/910-welding-joints-in-the-horizontal-welding-position.html
Now working angle can be categorized under four types. Let’s learn about them in detail:
- Flat position: Flat position can be sub-categorized under three more types:
-
- Butt joint: This occurs when the joint is 180 degree and you’ll need to perpendicularly position the gun against the workpiece and include 5-10 degree of travel speed in order to efficiently perform the task.
- T-joint: This requires when the joint is at 90 degrees and you’ll need to position the gun at 45 degrees against the workplace.
- Lap joint: This happens when the joint is on a lap position. Here, you’ll need to position the gun between 60 to 70 degrees which may increase in accordance with the metal thickness.
- Horizontal Position: As the name suggests, the welding is performed in a horizontal shape which can be easily influenced by gravity. The working angle should be reduced by 5 – 15 degrees from its perpendicular position. The traveling speed should be the same and the amperage and voltage settings should be slightly reduced.
- Vertical Position: Similar to that of horizontal position, this angle is also influenced by gravity and requires travel angle drop by 5 to 15 degrees from its perpendicular position. However, this process is best suited for thin materials because of fast travel speed that results in less penetration. This process also requires lower settings of amperage and voltage.
- Overhead Position: The final category having the most vulnerability to gravity, overheat position requires the fastest travel speed so that it doesn’t cause the weld metal to fall apart from the joint. This position also requires lower settings of amperage and voltage.
9. Travel Speed
Finally, this is the most crucial thing you have to consider in the overall MIG welding process. Not only does it make the weld bead perfect, but also help prevent potential porosity or undercutting to occur after the task. This speed should be adjusted according to the size of the weld puddle.
Final Words
Thanks for reading the whole post. We believe you’ve got an extensive idea about what is MIG welding and its basics. Apart from that, we’ve also discussed all the detailed and cautionary steps of MIG welding which will be essential for you when you’re in practice. Stay tuned with us for all upcoming welding related guides and articles. We appreciate your support.